December 19, 2012

Bootsplash With Initramfs


Bootsplash With Initramfs

I finally managed to have bootsplash patched into the SLAX kernel using the patches from here:

http://www.uli-eckhardt.de/bootsplash/index.en.shtml

Just need to edit one of the patches to remove some stuff from “Patch for 3.4 bootsplash-3.4.diff.bz2”. It will still work with later kernel versions.

After recompiling the kernel, to get the bootsplash working isn’t very clear on most websites. With the old initrd or initrd.gz, one would just do

splash -s -f [full path to bootsplash config] >> initrd

This unfortunately doesn’t work as the cpio created initramfs gets messed up if you do this. After going though a lot of websites with methods that didn’t work, I managed to look at the bootsplash patches and noted the portion under the “init” which basically says it will attempt to open the file /bootsplash. So that kind of implies that the bootsplash image should be in the initramfs. A little more Googling and I confirmed this on least two more websites. It was like finding gold let me tell you. A bit of experimenting prooved the point and I have bootsplash with the initramfs running now.

Bootsplash With Initramfs

Lots of people have said bootsplash is the past and with KMS it will be obsoleted, but I still think its the easiest to get working and for now it gives an option for those who want to brand their distros but don’t want to start compiling something else like fbsplash or plymouth. These are the steps I took:

  • Get the bootsplash user space utilities from from any of the links here: http://www.filewatcher.com/m/bootsplash-3.1.tar.bz2.112416-0.html
  • Compile and install the utilities. You should have a /etc/bootsplash and the splash tools in /sbin now.
  • Get your verbose and silent splash images or theme and config into /etc/bootsplash/themes
  • Generate the init bootsplash from the config with:
    /sbin/splash -s -f /etc/bootsplash/themes/<themename>/config/<configfile>.cfg > /tmp/bootsplash
  • Extract the initramfs to someplace (eg:/tmp/inittree) using:
    mkdir /tmp/inittree; cd /tmp/inittreexz -dc <path-to-slax-initrfs>/initramfs | cpio -i
  • Copy the whole of /etc/bootsplash to the /tmp/inittree/ and copy /tmp/bootsplash to /tmp/inittree (so its in the root of the inittree):
    cd /etc; cp -R /etc/bootsplash /tmp/inittree/etccp /tmp/bootsplash /tmp/inittree
  • Recompress initrfs with:
    cd /tmp/inittree; find . -print | cpio -o -H newc 2>/dev/null | xz -f --extreme > /tmp/initramfs
  • If this is for SLAX, the initramfs should be initrfs.img and you should then replace the stock Slax vmlinuz and initrfs.img with the patched kernel and the new initrfs.img. The initrfs.img increases by 30KB and vmlinuz increases by 10KB.
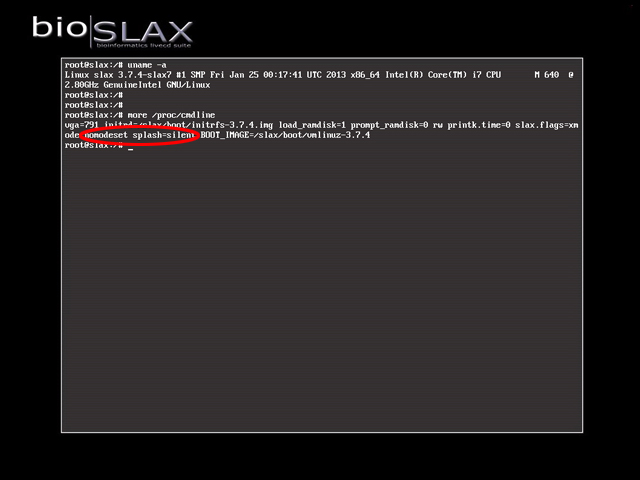
  • Make sure to edit the boot options and set vga=791 to get the bootsplash to show

The bootsplash will only show up like the old behaviour until the KMS kicks in, then it will dissapear. To keep the bootsplash around and have graphic background for your virtual terminals, use kernel parameter “nomodeset” (which disables KMS) at boot.

I’ve been playing around with nomodeset and a lot of different graphic cards and even without KMS, the X resolution is fine, especially for the new distros. The only card I’m constantly having trouble with is the Intel GM945. Thats the only one I need to use KMS modeset with so far.

Bootsplash With Initramfs

I figure there are other cards that give issues too, but I find a majority still work well without KMS, especially with the newer distros.

Bootsplash With Initramfs

Based on this, to make a SLAX based distro more appealing, I would propose the default to be booted with “nomodeset” to maintain the bootsplash and graphic background virtual terminals and have the KMS as a fall back mode for those troublesome cards. In other words, another option “KMS” other than “Persistent changes”, “Graphical Desktop”, “Copy to Ram”, etc. on the boot page of SLAX. Thats what I’ll be doing for the new BioSLAX anyway.

December 13, 2012

SLAX 7!


SLAX 7!

Its been a long wait, 3 years in fact, but SLAX, the pocket operating system on which my own BioSLAX is based, has resurfaced. SLAX 6.2 was the last official version released somewhere in late 2008, early 2009 and its creator Tomas Matejicek stopped all work on the project. Followers of his personal blog did know that he was still tinkering in the background, and when he announced that he had found commercial backing for SLAX, most of us started rubbing our hands in glee.

SLAX 7!

In any case, SLAX 7 was released a few days back – time to see if all that waiting was worth it.

August 25, 2012

Wire Power!


I’d been noticing that streaming HD videos from my NAS to my DLNA certified BD player was having intermittent buffering issues. The video would play for a while, then hang for a long while, then play a little, then hang again and so on. After a little bit of experimenting I figured that the HD streams were too large for the wireless to pump to the BD player. We’re talking about 8 to 12GB files here. So here I was, after changing all my networking equiptment to ensure the house was on a full Gigabit setup, but I couldn’t get my videos streamed from my NAS to my BD player properly. The solution was of course to get a wire to my BD player. How to do that was the issue since I didn’t have any network ports near the BD player.

I had a couple of 200Mbps Prolink homeplugs however and I figured they would be the solution, but unfortunately the stuttering didn’t stop even when I used the home plugs. I actually thought there was something wrong with my BD player, but on a hunch I decided to do some speed test over the Prolink homeplugs and I was appalled to see that they weren’t pushing data over more than 40 to 60Mbps. I went into research mode, hit Google and found out that most of the homeplugs didn’t really give great speeds, definitely never hitting what was stated on their packaging. I figured maybe it was old tech and there should be something new out there now, since most everyone was on a Gigabit network now. I was partially right, they didn’t make Gigabit homeplugs but Aztech had put out their 500Mbps homeplugs. Reading the reviews gave me a pretty good impression of the device and I headed out to purchase a pair from Challenger at S$75 each (found out later that Sim Lim was selling it at S$65, bummer!)

I plugged the devices in and it was super easy to pair, unlike the Prolink ones. Just press one of the plug’s config button for 2 seconds, watch the ‘home network’ led start to blink, go to the next plug and press it’s config button for 2 seconds. After the blinking stops, they’re paired, simple as that. I did the speed tests again and very happily saw speeds of between 200 and 220Mbps. It wasn’t 500Mbps, but as I said, the speeds are never what they advertise, but this was good enough!

Plugged the BD into the home plug and no more stuttering!

August 12, 2012

Detailed NAS-tiness


The problem

Looking for a way to upgrade the capacity of the My Book Live Duo (MBLD) 4TB to 6TB, I tried to swap the 2 x 2TB disks for 2 x 3TB hdds. The MBLD uses mdadm as its raid tool, and its use is pretty well documented on the web. As with most raid systems, the recommended way was to replace the disks one by one, letting the system reinitialize the disks and the later grow the raid array. Unfortunately, when I did this with the 3TB disks, the maximum size of the array was still stuck at either 2TB (raid1 mode) or 4TB (raid0 mode). The grow option with mdadm said the maximum size was already reached. Using the raid mode conversion or the factory reset on the web UI still only maxed out at 2TB with the 3TB disks.

That began 48 hours of trial and error (mainly because of the reinitializing/rebuilding of the array – took about 6 hours each time) and now at the end of the 48 hours, I have 3TB (raid1)/6TB (raid0) on my MBLD 4TB system.

Below are the steps I took. I’m pretty sure some of them can be left out, and probably someone knows a 3 step way of doing this, but this is how I got it done and for those who don’t know a way, I hope it works for you too.

Disclaimer

I accept no responsibility or liability if anything in the steps I’ve outlined, communicated or alluded to in any way, through any comments, views or statements of any form, bricks, incapacitates, renders unuseable or damages your device (whatever device it may be). By reading these instructions and carrying them out in whole or in part, you accept full responsibility for the outcome, whatever outcome that might be and absolve me, the website owner, the owner of the machine and all parties directly or indirectly related to this website and me from any liability whatsoever.

In other words, if you break what you’re working on, its ALL on YOU!


Pre-requisites

The guide below assumes very heavily that you have UNIX experience and you know at least what ssh is and how to do it using one of the many clients available or through another UNIX/MAC machine’s cli (if you don’t know what cli means, then I’d advise against continuing).

Enabling SSH

  • Boot the MBLD and access it from the web UI.
  • Add the “/ssh” to the end of the URL (ie: http://<MBLD_IP>/UI/ssh) to access the SSH settings
  • Enable ssh

Initializing the new drives

  • Shut down the MBLD and remove ONE drive and replace it with the higher capacity drive
  • Boot up the MBLD – the led will be yellow but you can still access it over SSH and the web UI
  • The web UI will have a red ‘i’ icon with the message that a drive is being reinitialized – let it continue
  • When it has finished initializing the disk, reboot the MBLD and repeat the last 3 steps for the 2nd hard drive (whole thing can take a few hours)
  • After the 2nd higher capacity disk has been reinitialized, reboot the device to make sure it comes up correctly.
  • The web UI should still say you only have 4TB (raid0/spanning mode) or 2T (raid1) even though you are now using the higher capacity drives.

Removing the raid partitions

  • Use PuTTy (or any other ssh client) to ssh to the MBLD as root, using the password ‘welc0me’
  • Check for the raid mount using ‘df -h’ it should be /dev/md3 mounted to /DataVolume (one with the largest storage)
  • Unmount /dev/md3 with ‘umount /dev/md3’
  • Check which partitions make up the raid using ‘mdadm -D /dev/md3’ – you should see 2 partitions, /dev/sda4 and /dev/sdb4
    # mdadm -D /dev/md3
    /dev/md3:        
            Version : 1.2  
      Creation Time : Sat Sep 15 10:40:58 2012     
         Raid Level : linear     
         Array Size : 3897997296 (3717.42 GiB 3991.55 GB)   
       Raid Devices : 2  Total Devices : 2    
        Persistence : Superblock is persistent    
    
        Update Time : Sat Sep 15 21:44:03 2012          
              State : clean 
     Active Devices : 2
    Working Devices : 2 
     Failed Devices : 0  
      Spare Devices : 0           
    
               Name : MyBookLiveDuo:3  (local to host MyBookLiveDuo)
               UUID : 7d229761:df1a7961:f3f1f7dd:388be367
             Events : 173
    
        Number   Major   Minor   RaidDevice State
           0       8        4        0      active sync   /dev/sda4
           1       8       20        1      active sync   /dev/sdb4
  • Use ‘parted’ and select /dev/sda then print the partition info using ‘p’
  • You will see that the last partition is /dev/sda4
    # parted /dev/sda
    GNU Parted 2.2
    Using /dev/sdaWelcome to GNU Parted! Type 'help' to view a list 
    of commands.
    (parted) p
    Model: ATA WDC WD30EZRX-00D (scsi)
    Disk /dev/sda: 3001GB
    Sector size (logical/physical): 512B/512B
    Partition Table: gpt
    
    Number Start  End    Size   File system    Name    Flags 
     3     15.7MB 528MB  513MB  linux-swap(v1) primary raid 
     1     528MB  2576MB 2048MB ext3           primary raid 
     2     2576MB 4624MB 2048MB ext3           primary raid 
     4     4624MB 2000GB 1996GB                primary raid 
    (parted)
  • As can be seen, even though you are using a higher capacity drive, the partition is still only 2TB in size
  • Use ‘rm 4’ to remove /dev/sda4
  • Repeat the last 4 steps, running ‘parted’ on /dev/sdb (instead of /dev/sda)
  • Now you would have removed both /dev/sda4 and /dev/sdb4 from disks

Creating correctly sized raid partitions based on 3T hdds

  • Reboot the MBLD – the led will stay yellow (may turn red), but you can still access it
  • Use PuTTy to ssh into the MBLD again
  • If you do ‘mdadm -D /dev/md3’ now, it will say there is no such raid device (since you removed the 2 partitions /dev/sda4 and /dev/sdb4 that comprised the raid)
  • Run ‘parted /dev/sda’
  • Do ‘mkpart 4 4624MB 3T’ and ‘set 4 raid on’
  • When you do ‘p’ now you will see the 3TB size for the /dev/sda4 partition
    4      4624MB  3001GB  2996GB                  primary  raid
  • Repeat the last 3 steps, running ‘parted’ on /dev/sdb (instead of /dev/sda)
  • Both /dev/sda4 and /dev/sdb4 should now be correctly sized
  • Format /dev/sda4 using ‘mkfs.ext4 -b 65536 -m 0 /dev/sda4’
  • Repeat the last step for /dev/sdb4 (instead of /dev/sda4)

Recreating the raid array with the new partitions

  • Now create the raid array using ‘mdadm –create /dev/md3 –level=mirror –raid-devices=2 /dev/sda4 /dev/sdb4’
  • The above step creates a raid1 mirror setup, to create a raid0 stripe setup, change ‘–level=mirror’ to ‘–level=linear’
  • Format the raid array using ‘mkfs.ext4 -b 65536 -m 0 /dev/md3’
  • Once completed you should test that its ok by doing ‘mount -t ext4 /dev/md3 /DataVolume’
  • If the above mounts correctly, then you’re all set – reboot the MBLD and you should have a 3TB size visible with raid1 setup.

UPDATE:

Just like I said, there is an easier way (not 3 steps though) to do this and if you’re comfortable with UNIX and the command line (like I expect you to be before doing any of the above) and you have a Ubuntu box lying around, you can try out the quick and easy way here. I’m told it works, but I haven’t tried it out myself yet, so, try at your own risk!

August 4, 2012

NAS-ty WD


NAS-ty WD

So I finally got a NAS. I’d been reading up on quite a few of the lower end NAS units and reviews were generally good for WD’s My Book Live Duo. Built in DLNA server, SSH, RAID 0 or 1, good UI, access apps for iPhone and Adroid and to top it all off, it had options of 4TB or 6TB capacities with either 2x2TB or 2X3TB drives which could be swapped out. The swappability was what edged me towards this baby. I figured that I could buy the 4TB cheaper than the 6TB and when the price of the 3TB drives came down, I’d just get 2x3TB drives and swap out the 2X2TB drives and presto, as simple as that, higher capacity NAS.

NAS-ty WD

Well I was half right anyway. Yes, you could easily swap out the 2TBs for 3TBs, but no, it was nothing close to simple.

NAS-ty WD

First off, WD gets really territorial about the type of drives you put in there – its got to be WD drives and nothing else. You put in any other drive and it complains about incompatibility. Is there such a thing as an incompatible drive for a piece of equiptment this low end? Absolutely not. I poked around the filesystem and found whitelist XML that the system uses to filter off the drive parameters searching for the WD model prefix. If it doesn’t find it, it starts complaining and pushes the status LED to yellow, telling the user that troubles afoot. I couldn’t have that, so I edited the script, added in a line to allow a pair of Hitachis I had lying around.

<WhiteList> 
<Model description="Desktop Caviar">^WDC WD3[0-9].{7}M$</Model>
<Model description="Specific Enterprise RE" etype="constant">WDC WD30EZRX-00M</Model>
<Model description="Misc." etype="re">^WDC WD30EZRX-[0-9]{2}.*$</Model>
<Model description="ALL">^WDC WD.*$</Model>
<Model description="ALL">^Hitachi HDS5.*$</Model>
</WhiteList>

NAS-ty WD

That portion dealt with, I started pulling out the drives to see how the system rebuilt things. First was one drive, then the other, then I pulled both out and replaced them with new drives. Heres the issue. Apparently this NAS stores only a basic OS set in the firmware. When new drives are plugged in, the firmware will partition the drives into 4 parts:

  • 1x512MB swap partition
  • 2x2GB ext3 partitions
  • 1x2TB unformated partition

It then creates a RAID1 volume (/dev/md0) out of the 2x2gb partitions of both drives and starts copying the rest of the system files (boot/, bin/, usr/, etc) there and mounts it as /. From here everything else is setup including a second raid volume (/dev/md3) which will be your storage, either in RAID1 or RAID0 mode. This is where things get sticky. The system then formats the drives you put in up to 2TB only, no matter what the capacity of the drives. Of course I didn’t know that off hand so I ended up letting it format the drives and only after it finished did I realise it was only using 4 of my 6TBs. Back to the drawing board. I Googled for an entire night and found that no one was trying to swap out the 2x2TB for 2x3TB on this NAS! I mean, come on! Didn’t anyone else think of doing it?

With nothing to refer to, I started poking around the base system files and managed to piece together how the RAID volume is created and what was being used. This just happened to be mdadm. From the system scripts and the current partition information, I managed to reformate the disks to full capacity and get the RAID partition to the max, giving me my 3TB per disk. You’d think it would be smooth sailing from here right? Wrong. My formatted logical volume couldn’t be read by the system! Thankfully, this time someone did note a similar issue with one of WD’s other NAS devices and indicated a very unique block size requirement that was the issue. Formatting the partition using that block size, allowed the system to read the disk and after that it was a matter of using either mdadm or the UI to create the raid type I wanted.

Heres the weird thing – the firmware for the 4TB and 6TB NAS devices is exactly the same. There should be no reason why formatting the drives in the UI shouldn’t give me the maximum capacity for the drives. The system’s parted command config has this:

mkpart primary 4624M -1M

The -1M means to format from the given starting size (in this case 4624M) to the very last block, effectively giving the full capacity of the disk, but for some reason it doesn’t happen, hence the necessity to do things manually.

Took me over 2 days to get my 4TB up to 6TB but despite all the hassle, it was a good lesson. If anyone else wants the detailed steps of how I upgraded the WD My Book Live Duo from 4TB to 6TB, you can look here, but unless you have a whole load of time on your hands or you are really desperate to get your hands dirty and learn something, I suggest forking out a S$100.00 or so more and getting the 6TB direct.

UPDATE:

Some folks have been asking for the steps I took to upgrade the capacity to be placed on this site, what difference it makes where the instructions are, I have no idea. In anycase, I’ve put the details in the next post.

July 14, 2012

New Toy


Nope, its not mine – birthday present for the wife. Though the amount of time I spent setting this thing up it certainly makes it feels like it should be mine!

June 3, 2012

Of Gigabit Routers


After I got my M1 fiber broadband installed back in December of 2011, I decided to switch everything (and I mean everything) of the home network to a Gigabit network in phases. All our machines and devices were obviously capable of Gigabit speeds, so why restrict my internal speeds to old technology? So I then set about looking for the appropriate router switches and wireless routers for phase one of the change process.

As far as home networking goes, I’ve always been particular to D-Link. Its no-nonsense management GUIs and life time 1-for-1 replacement policies have always been a plus point for me for well over a decade. My first 11b wireless card was from D-Link and it when it spoilt, D-Link exchanged it for me to a brand new 54G card because they didn’t make the old card anymore.

So it was no surprise that I looked at D-Link first off and went out and got me an Xtreme N Gigabit DIR-655 wireless router. Its a 4 Gigabit LAN port, 1 USB 2.0 port, N based wireless router which boasts QoS and WISH (Wireless Intelligent Stream Handling) along with the standard WDS. Reviews weren’t half bad, but I have to say they weren’t peppered with high praise either. I soon found out why. First of all I’ll say this device isn’t all that bad for a simple wireless setup. It handles your basic encryption, broadcast of SSIDs and all that without issue. But for a more robust user, its brainlessness is mind boggling. Firstly the web based management console is mighty complicated. Ok, maybe its not as complicated as it is wordy. Theres just a lot of explanation for each section which immediately turns a user off. Another annoyance is its MAC filtering option. Most wireless routers offer this to ensure random strangers who guess your WPA2 (you aren’t still using WEP aren’t you???) passphrase still can’t access your network unless you authorise their network cards to use it, but D-Link seems to want to take this one step further and implement the MAC filtering for the 4 Gigabit LAN ports as well! Is that really so bad you might ask? Well no its not, except that in this case, D-Link makes absolutely NO distinction between wireless and wired filtering. You can’t turn one on and the other off, its either both or nothing. So you can’t just plug your new notebook into the network, you have to add its MAC address to the router’s MAC ACL. Thoroughly annoying! Whats worse, through 3 different upgrades of the firmware, the settings always get wiped out if the router powers off! Further testing showed that the settings wipe out only occurs if you set the MAC filters! I mean, come on! I spend a good part of the hour typing in all the MAC addresses I want filtered and then I power off the device and boom! Everything is gone! And before you ask, no there is no IMPORT function (that almost every other wireless router has) to import a saved MAC filter list to the router.

Being completely disgusted with the D-Link, I took it back to the shop and after a very long rant and complaint session with 3 assistants and the manager, manged to (and I understand this is a first time for the shop) exchange it for a TP-Link WR2543ND. The TP-Link was way cheaper so I got to pick a few other times to make up the price, but thats another story. Anyway, the WR2543ND has a dual band (2.4GHz and 5GHz) for transmission up to 450Mbps over the less crowded 5GHz band, WDS, QoS and a USB for file sharing, print sharing or even DLNA server for media. All in all a good wireless N router and it gives good range as well.

After using the TP-Link for a bit, I started to look into more TP-Link devices, just buying a WR1043ND (300MHz wireless N router) recently to boost my wireless signal to the rest of the house. In many ways TP-Link reminds me of D-Link of old. A simple, intuitive management console, no fuss setup and common sense functionality (especially for it MAC filtering option) and its cheap as well.  Many of the bigger brands have gone well into the S$200 range offering nothing more than what the TP-Link is offering for under S$140. Not only are their routers, switches and wireless devices good (and cheap – every Singaporean’s dream), so are a couple of their other items, like their homeplugs and IP cameras.

If you’re looking for a starter set of devices for home use, I’d recommend using the TP-Link stuff. You might be surprised at the quality and functionality of the product you’re getting for a much reduced price over the bigger branded competition.

May 20, 2012

Tech Blog Anyone?


And so yes, after being told countless times by countless people, I’m finally starting a tech blog.

I have this nasty habit of playing with tech, configuring and testing setups and compiling and hacking code and then completely forgetting what I did to get it all working in the first place, so that doing it again becomes a pain – thankfully I have a good (some say too good) memory.

In any case, its about time I document stuff, especially since age is catching up with me and, while still better than most people, my memory does fail me at times.